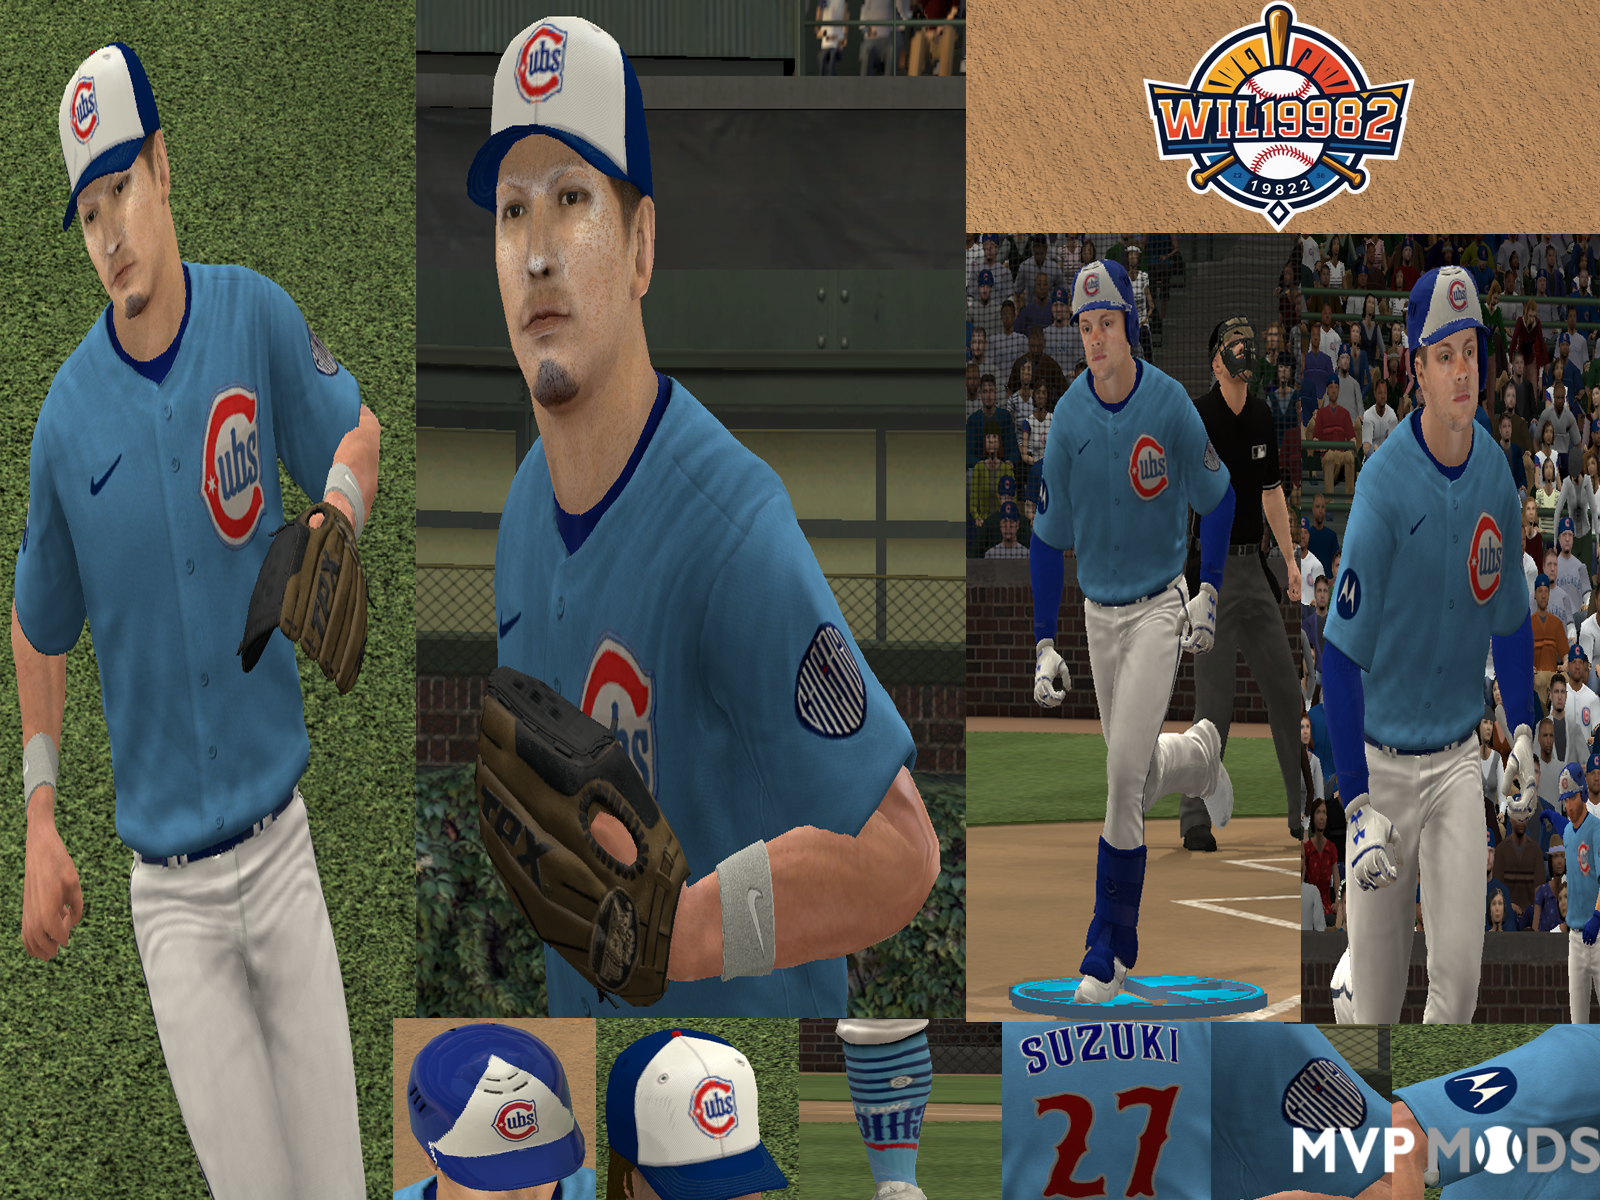

About This File
Replacing Logos and Other Graphics with Photoshop and nfshtool - v 1.0
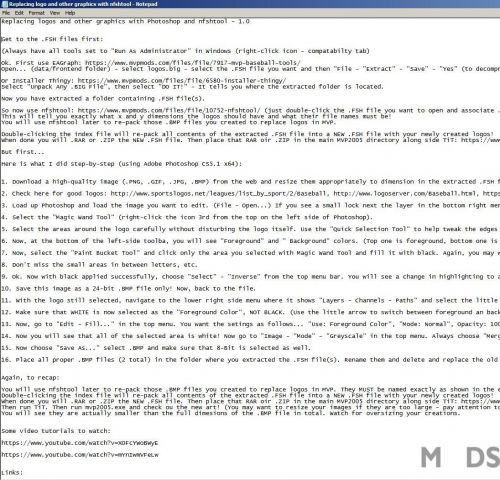
Get to the .FSH files first:
(Always have all tools set to "Run As Administrator" in Windows (right-click icon - compatabilty tab)
Ok. First use EAGraph: https://www.mvpmods.com/files/file/7917-mvp-baseball-tools/
Open... (data/frontend folder) - select logos.big - select the .FSH file you want and then "File - "Extract" - "Save" - "Yes" (to decompress).
Or Installer Thingy: https://www.mvpmods.com/files/file/6580-installer-thingy/
Select "Unpack Any .BIG File", then select "DO IT!" - It tells you where the extracted folder is located.
Now you have extracted a folder containing .FSH file(s).
So now use nfshtool: https://www.mvpmods.com/files/file/10752-nfshtool/ (just double-click the .FSH file you want to open and associate .FSH files with nfshtool.exe) to extract what is INSIDE the .FSH file.
This will tell you exactly what x and y dimensions the logos should have and what their file names must be!
You will use nfshtool later to re-pack those .BMP files you created to replace logos in MVP.
Double-clicking the index file will re-pack all contents of the extracted .FSH file into a NEW .FSH file with your newly created logos!
When done you will .RAR or .ZIP the NEW .FSH file. Then place that RAR oir .ZIP in the main MVP2005 directory along side TiT: https://www.mvpmods.com/files/file/6581-total-installer-thingy/
But first...
Here is what I did step-by-step (using Adobe Photoshop CS5.1 x64):
1. Download a high-quality image (.PNG, .GIF, .JPG, .BMP) from the web and resize them appropriately to dimension in the extracted .FSH file(s):
2. Check here for good logos: http://www.sportslogos.net/leagues/list_by_sport/2/Baseball, http://www.logoserver.com/Baseball.html, https://www.google.com/imghp?hl=en&tab=wi
3. Load up Photoshop and load the image you want to edit. (File - Open...) If you see a small lock next the layer in the bottom right menu, double click and select "OK" to remove it! You now have "Layer 0".
4. Select the "Magic Wand Tool" (right-click the icon 3rd from the top on the left side of Photoshop).
5. Select the areas around the logo carefully without disturbing the logo itself. Use the "Quick Selection Tool" to help tweak the edges if you need to, it is located in the same place as the "Magic Wand Tool".
6. Now, at the bottom of the left-side toolba, you will see "Foreground" and " Background" colors. (Top one is foreground, bottom one is background). Make sure that foreground is set to black, R=0 ,B= 0, G= 0.
7. Now, select the "Paint Bucket Tool" and click only the area you selected with Magic Wand Tool and fill it with black. Again, you may want or need to make use of "Zoom In/Out" or "Pencil Tool to tweak it to a finished look.
8. Don't miss the small areas in between letters, etc.
9. Ok. Now with black applied successfully, choose "Select" - "Inverse" from the top menu bar. You will see a change in highlighting to around the logo itself!
10. Save this image as a 24-bit .BMP file only! Now, back to the file.
11. With the logo still selected, navigate to the lower right side menu where it shows "Layers - Channels - Paths" and select the little menu icon next to the word "Paths" and select "New Layer..." Highlight this new layer.
12. Make sure that WHITE is now selected as the "Foreground Color", NOT BLACK. (Use the little arrow to switch between foreground an background colors). Do NOT apply white, just switch to it.
13. Now, go to "Edit - Fill..." in the top menu. You want the setings as follows... "Use: Foreground Color", "Mode: Normal", Opacity: 100%", Preserve Transparency (Unchecked). Click "OK".
14. Now you will see that all of the selected area is white! Now go to "Image - "Mode" - "Greyscale" in the top menu. Always choose "Merge" if asked, and always choose "Discard" when asked.
15. Now choose "Save As..." select .BMP and make sure that 8-Bit is selected as well.
16. Place all proper .BMP files (2 total) in the folder where you extracted the .FSH file(s). Rename them and delete and replace the old ones.
Again, to recap:
You will use nfshtool later to re-pack those .BMP files you created to replace logos in MVP. They MUST be named exactly as shown in the extracted .FSH file(s)!
Double-clicking the index file will re-pack all contents of the extracted .FSH file into a NEW .FSH file with your newly created logos!
When done you will .RAR or .ZIP the NEW .FSH file. Then place that RAR oir .ZIP in the main MVP2005 directory along side TiT: https://www.mvpmods.com/files/file/6581-total-installer-thingy/ and the mvp2005.exe file.
Then run TiT. Then run mvp2005.exe and check ou the new art! (You may want to resize your images if they are too large - pay attention to where the logos are oriented in the DEFAULT .BMP files you extracted.
You will see they are actually smaller than the full dimesions of the .BMP file in total. Watch for oversizing your creations.
Some video tutorials to watch:
https://www.youtube.com/watch?v=XOFcYWoBWyE
https://www.youtube.com/watch?v=mYnIwmVFeLw
Links:
EAGraph - https://www.mvpmods.com/files/file/7917-mvp-baseball-tools/
Installer Thingy - https://www.mvpmods.com/files/file/6580-installer-thingy/
Total Installer Thingy - https://www.mvpmods.com/files/file/6581-total-installer-thingy/
nfshtool - https://www.mvpmods.com/files/file/10752-nfshtool/