Kccitystar Posted May 4, 2020 Share Posted May 4, 2020 If you need to find portraits, here's a faster way, and I'm surprised this method still works. What you will need: Adobe Photoshop CS5 or higher NVIDIA Texture Tools (download the plugin for Adobe Photoshop) So, Yahoo! Sports has HD official portraits, but you just need to modify the URL to access them. Search the name of the player in the Search Box. ("Bo Bichette" for example. You will need to click on his player profile, otherwise just typing his name and clicking Search will perform a Yahoo! search instead) The player's page that shows up will show a small presentation with a portrait in it. Right click on the picture and click the "Open the image in a new tab" option. A new tab should open with the picture in small dimensions. The url of the picture should be something like this: https://s.yimg.com/it/api/res/1.2/mX3dVMvmiuo3uI1PmQCXgg--~A/YXBwaWQ9eW5ld3M7dz0zMDA7aD0yMDA7cT0xMDA-/https://s.yimg.com/xe/i/us/sp/v/mlb_cutout/players_l/03242019/10766.png Erase all the bold parts until you see "https" again in the link: https://s.yimg.com/it/api/res/1.2/mX3dVMvmiuo3uI1PmQCXgg--~A/YXBwaWQ9eW5ld3M7dz0zMDA7aD0yMDA7cT0xMDA-/https://s.yimg.com/xe/i/us/sp/v/mlb_cutout/players_l/03242019/10766.png Click Enter. You should have the portrait picture with bigger dimensions, something around 3500x2300. Save the picture. It should be a PNG with the transparency preserved (which is a major, major plus for players with long hair, like Bo, or even Bryce Harper), so we will open this in Photoshop. Link to comment https://www.mvpmods.com/forums/topic/62853-how-to-create-player-portraits-using-photoshop/ Share on other sites More sharing options...
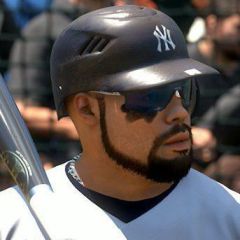
Kccitystar Posted May 4, 2020 Author Share Posted May 4, 2020 What we want to do now is also open up a blank 512x512 image. At least for this tutorial, so that everything looks smooth and quality when you import this into the game, let's make the background color black. Once we have our black 512x512 image, let's copy and paste Bo's portrait into that image. Bo should be in a new layer (Layer 1) in your 512x512 image. Obviously Bo's portrait is way too big to fit, so we'll need to resize. Go to Edit-> Transform-> Scale. Holding the Shift key will retain/lock the picture's proportions so it doesn't warp as you resize (Another method that locks the proportions evenly is to click on the lock icon in between the W and H values to do this as well). For a portrait like this, usually something in the range of 20%-25% should be fine. In my case, what I try to do is get the shoulders to touch the corners of the photo as much as I can. There will be some players where this is going to be slightly difficult because of the camera angle or how the player is standing, but that's okay. The goal you want to achieve when you resize is to make sure the neck and head are in the photo with the least amount of jersey. This is perfect, so we'll click on the check mark to confirm our resize. Now, what we need to do is set an alpha channel, so Bo's portrait can be visible when we import it. This is pretty easy, since Bo's photo is already transparent. Switch over to the rectangular marque tool ('M' key on the keyboard) and let's right click on Bo's face and select Load Selection: We can click OK here. It will make a selection outlining Bo's photo. Bingo! Now we can switch over to Channels so we can create an alpha channel. From this new Alpha channel, we can just use Ctrl+I to Invert the colors of the selection (it's only black and white, so this outline will turn white). Once it turns white, we can then use Ctrl+D to Deselect the selection. We now have our alpha channel, and now we can merge everything together using Ctrl+Shift+E, or going to Layer and then selecting Merge Visible. If you did this correctly, this should be your finished product: Let's go ahead and save this portrait with Bo Bichette's ID from the portrait ID list for all 2020 rosters (his ID is 9410). We need to save this as a DXT5 so that it retains the alpha channel (if you can see the DXT5 description, it's got ARGB, meaning we're telling the game that this portrait has an alpha channel to define what MLB 2K12 can see and what it can't): Click on Save. Congratulations, you've made your first portrait! Bo is happy. Bo is excited. Bo is proud. Link to comment https://www.mvpmods.com/forums/topic/62853-how-to-create-player-portraits-using-photoshop/#findComment-687099 Share on other sites More sharing options...
Bostonnico Posted May 5, 2020 Share Posted May 5, 2020 @Kccitystar Another huge contribution for MLB2k, a thousand thanks for teaching me a better way to do the portrait, I did it in a different way and now thanks to your tutorial everything seems easier and faster. greetings and blessings to you bro Link to comment https://www.mvpmods.com/forums/topic/62853-how-to-create-player-portraits-using-photoshop/#findComment-687110 Share on other sites More sharing options...
Kacnep87 Posted May 5, 2020 Share Posted May 5, 2020 Why background is not transparent? I made it transparent and all work correctly. Here is that red ... Link to comment https://www.mvpmods.com/forums/topic/62853-how-to-create-player-portraits-using-photoshop/#findComment-687112 Share on other sites More sharing options...
Kccitystar Posted May 5, 2020 Author Share Posted May 5, 2020 4 hours ago, Kacnep87 said: Why background is not transparent? I made it transparent and all work correctly. Here is that red ... The red is Adobe Photoshop's way of telling you that the alpha channel is enabled and visible in the file. Whatever is black in the alpha channel is transparent and the game can't see it, whatever is white is visible in the alpha channel and the game will see it. Link to comment https://www.mvpmods.com/forums/topic/62853-how-to-create-player-portraits-using-photoshop/#findComment-687113 Share on other sites More sharing options...
Kacnep87 Posted May 5, 2020 Share Posted May 5, 2020 2 hours ago, Kccitystar said: The red is Adobe Photoshop's way of telling you that the alpha channel is enabled and visible in the file. Whatever is black in the alpha channel is transparent and the game can't see it, whatever is white is visible in the alpha channel and the game will see it. When i make portraits (i watched Wolf of 2K video), i delete background in my image, then i save it as .dds. That's all. After installing my potraits pack i see all portraits in game correctly. Link to comment https://www.mvpmods.com/forums/topic/62853-how-to-create-player-portraits-using-photoshop/#findComment-687114 Share on other sites More sharing options...
Kccitystar Posted May 5, 2020 Author Share Posted May 5, 2020 10 minutes ago, Kacnep87 said: When i make portraits (i watched Wolf of 2K video), i delete background in my image, then i save it as .dds. That's all. After installing my potraits pack i see all portraits in game correctly. And that's fine. It's just a different way to get a similar result with a different program. Photoshop and GIMP are image editing programs with different workflows. Link to comment https://www.mvpmods.com/forums/topic/62853-how-to-create-player-portraits-using-photoshop/#findComment-687115 Share on other sites More sharing options...


Recommended Posts
Archived
This topic is now archived and is closed to further replies.